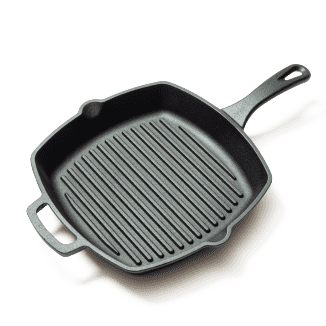
We tested enameled or plain cast-iron grill pans in a range of sizes and shapes. The best grill pans were roomy, had low sides that made it easy to maneuver a spatula under food, and featured tall ridges that made distinct grill marks. They were made from traditional cast iron that arrived preseasoned, so they released food easily from the beginning and got even better over time. Our winner, the Lodge Chef Collection 11 Inch Cast Iron Square Grill Pan, is affordable at about $35. Our runner-up, the Borough Furnace Grill Pan Braising Lid, is significantly more expensive (just over $100), but it’s beautiful and handmade.

A Few Reasons We Love Our Winning Grill Pan
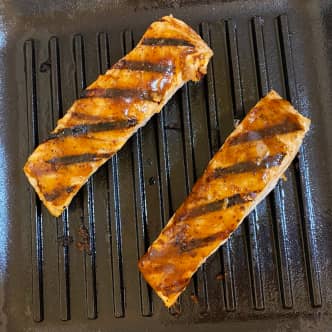
Besides the photoworthy grill marks.Grill pans are skillets customized with ridges across the cooking surface to mimic the cooking grates of a grill. When we compared burgers, panini, and salmon made in ordinary skillets with the same foods made in grill pans, the foods made in the ordinary skillets were less visually appealing and lacked the flavorful char marks produced by the grill pans. We use grill pans to make pressed sandwiches and to grill meats and vegetables. The pan’s hot ridges sear grill marks onto the surfaces of food while radiant heat cooks the food. Fat drains away from the food to the channels between the ridges.

Grill pans can be made from different materials, including heavy cast iron (enameled or plain) or thinner, lighter sheets of nonstick aluminum or steel (and sometimes nonstick cast aluminum). From previous testing, we know that we prefer cast-iron models for their superior heat retention and taller, more distinct ridges that make better grill marks. Thinner nonstick versions are stamped out of a sheet of metal, so the ridge shapes have to be low and rounded to keep the metal from tearing as it’s stamped. As a result, their grill marks—the whole point of this kind of pan—are wimpy.

What To Look For
- Uncoated cast iron: The surface of a plain, uncoated—rather than enameled—cast-iron grill pan will only become better and more naturally nonstick as you use it. While these pans arrive preseasoned by their manufacturers (with baked-on vegetable oil), that initial patina will keep improving every time you cook, gradually adding to the polymerized oil that’s bonded to the cast iron, which is called seasoning. Seasoning allows foods to release effortlessly from the pan and makes the pan easier to clean. Who doesn’t love a product that improves if you use it for years and years?
- Short walls: Short walls allow spatulas to slide under food at low, controlled angles, so foods release intact.

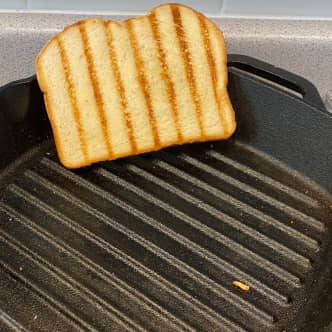
- Tall, substantial ridges: The taller the ridges, the more deeply they mark food. The ridges on our highest-ranked pan, which were more than twice as tall as the ridges on one of our lowest-ranked pans, made the most impressive crisp, bold grill marks. Pans with tall ridges also elevated food well above any drippings. As for shape, we loved the look of thick, squared-off ridges, but pans with slightly rounder ridges did well as long as they were also wide and tall.

- Well-spaced ridges: We preferred pans with ridges that were at least fingertip-width apart, because we could get in and scrub between them more easily, by hand or with a brush. More space meant fewer nooks to trap food, making cleanup easier.
- Roomy surface: With plenty of space, you can cook in fewer batches. Fewer batches means less mess and smoke, because the residue of previous batches can burn.
- Smoother seasoning/cooking surface: Right out of the box, we found some pans’ surfaces extremely rough; the surfaces stuck to food and ripped lint from both paper towels and cloth dish towels when we wiped them. While all the plain cast-iron pans showed improvement as seasoning started to build up with a few weeks of use, we preferred pans that arrived expertly preseasoned and/or machine-sanded to smoothness. Right from the start, they were easier to cook in and clean.

Secrets to Making a Grill Pan Smoke Less
You can enjoy cooking in your grill pan—without setting off the smoke detector.- Moderate weight: Our favorites were around 6½ to 7 pounds, balancing heat retention with maneuverability.
- Two looped handles: Pans with two looped handles are easy to lift and store. With no extended skillet-style handle, these models have a more compact profile for storage (or the stovetop), and their weight feels more evenly balanced when you need to lift them.

What To Avoid
- Nonstick-coated aluminum or steel: While they’re easy to clean, these pans aren’t durable and don’t improve with time and lots of use like cast iron does. You’ll need to replace these pans.

The Best Way to Clean a Cast-Iron Grill Pan
Getting stuck food out of a grill pan can be a pain, but a few tips and an essential tool make it simple.- Enameled cast iron: OK, maybe “avoid” is kind of strong, but enameled cast iron will never become more nonstick like plain cast iron, and it takes a little pampering to maintain over time. Enamel was not particularly good at releasing food (during testing, an enameled pan caused one of the worst cases of fish sticking and breaking up) compared with well-preseasoned uncoated cast-iron versions. The nonstick ability of enamel won’t improve over time, since the enamel prevents the pan from acquiring more than a very light seasoning patina. In fact, rough treatment can damage the enamel’s smooth surface, potentially making the pan more sticky (rather than less sticky) in years to come.

- Tall walls: In pans with tall walls, spatulas have to approach food at a steep, awkward angle, making it harder to release the food and lift it intact, especially when working with delicate foods such as fish. (The pan’s going to splatter either way, so make it easy on yourself with low walls.)
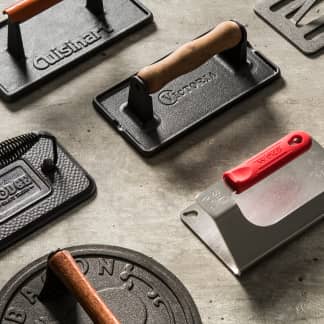
- Low, stumpy ridges and/or ridges with skinny tops: Grill marks can come out wimpy, uneven, and thin rather than bold, distinct, and crisp. Some pans only made strong marks if we were using a grill press. On pans with lower ridges, the food isn’t elevated over any rendered fat, so the second side often lacks any grill marks and comes out greasier.
- Tightly spaced ridges: Pans without enough space between their ridges trap food and make cleanup a nightmare.


- Small cooking surface: Some pans have only a small ridged section in the middle of the cooking surface, limiting available grilling space. Others are small all over, so you have to cook in multiple batches, creating more opportunity for residue in the pan to scorch and smoke.
- Heavy or light pans: Heavy, clunky pans are a bear to lift and use, while overly lightweight ones can easily overheat and scorch food.

The Best Way to Flip Food in a Grill Pan
How to work with the ridges in your grill pan to keep food intact and beautiful.- Single handles: Grill pans shaped like skillets with a single long handle felt more off-balance and less compact to store than dual-handled models.
The Tests
- Grill white sandwich bread slices in each pan, using a grill press (if not included with the pan); evaluate the grill marks
- Grill panini, four 4-ounce burgers, and Glazed Salmon in each pan
- Clean the pans by hand after each test
- Evaluate the condition of the pans at the conclusion of testing
How We Rated
- Performance: We evaluated the flavor, texture, and appearance of the food made in each pan.
- Ease of Use: We considered how easy it was to handle, maneuver, and cook in each pan.
- Cleanup: We evaluated how difficult it was to clean the pans and noted their conditions at the conclusion of testing.